Remote Hardware API
App Container provides a powerful HTTP REST API and in-app JavaScript bridge engine to control hardware peripherals built into AVS dedicated touch panels (such as the AVS-10 and AVS-15).
⚠️ Hardware Requirement: Hardware control endpoints (Terminal shell, GPIO & Relays, LED strip, RS-232/485 serial ports, UDP send, and RTC sleep/wake) require supported AVS Touch Panel hardware. Standard consumer smartphones and tablets do not feature these physical hardware interfaces.
🔌 Rear Panel Hardware Connectors
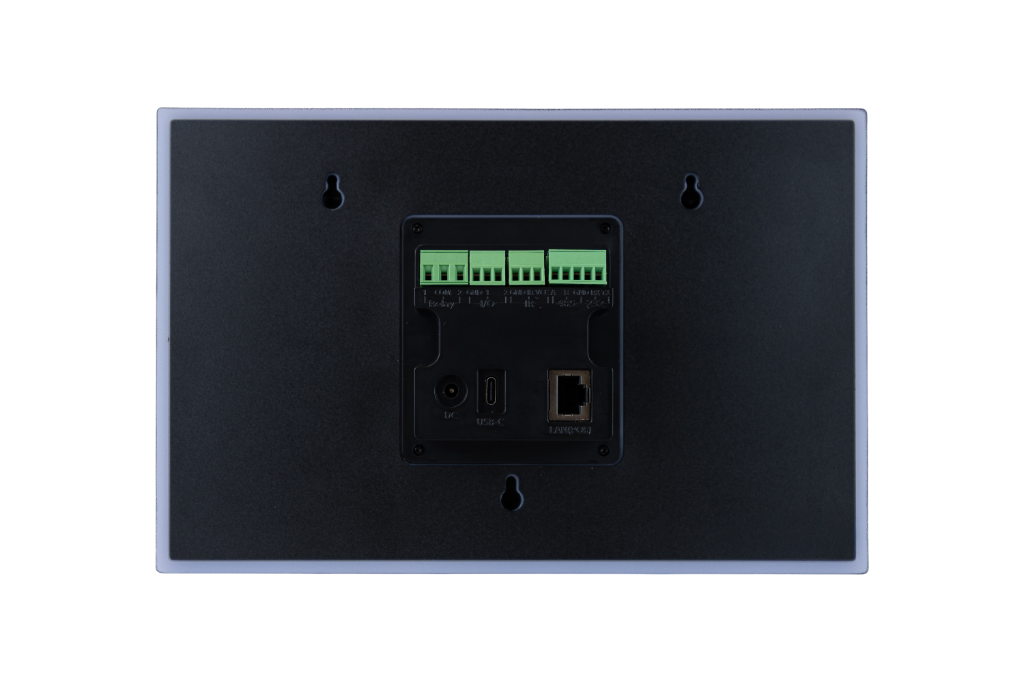
Rear panel hardware layout showing terminal blocks, DC power input, USB-C, Gigabit PoE+ LAN, and wall mount keyholes.
| Terminal / Port | Terminal Labels | Description |
|---|---|---|
| Relay | 1, COM, 2 | Relay output contacts (Relay 1 and Relay 2) |
| I/O | GND, 1 | Digital Input/Output pins (IO 1 and IO 2) |
| IR | 2, GND, 1 | Infrared transmitter output ports for IR blasters/emitters |
| RS-485 | B, A, GND | Differential RS-485 serial port (/dev/ttyS9) |
| RS-232 | TX, RX, GND | Full-duplex RS-232 serial control port (/dev/ttyS5) |
| DC | 12V DC | Optional 12 VDC external power adapter jack |
| USB-C | USB-C | USB OTG port for flash drives, peripheral extension, or debugging |
| LAN (PoE) | RJ-45 | Gigabit Ethernet network port with IEEE 802.3at PoE+ support |
🔒 Authentication & Base URL
HTTP endpoints are hosted by App Container's internal web server running on the touch panel:
http://{panel-ip}:8080/api/remote/
All endpoints require a Bearer token in the Authorization header, visible in the App Container settings menu.
Authorization: Bearer <your-bearer-token>
JavaScript Bridge Note: HTML5 projects running locally inside App Container do not need HTTP tokens or network requests. They can interact directly via
window.appcontainerbridge methods.
🖥️ Terminal Shell Execution
Execute shell commands on the host operating system. Commands run with a 30-second timeout.
POST /api/remote/terminal/exec
Content-Type: application/json
Authorization: Bearer <token>

{
  "command": "cat /proc/version"
}
Response (200 OK)
{
  "command": "cat /proc/version",
  "stdout": "Linux version 5.10.198...",
  "stderr": "",
  "exitCode": 0,
  "duration": "12ms"
}
⏰ RTC Sleep & Wake Scheduling
Schedule automatic device sleep and wake-up times. Alarms persist across system reboots.
GET /api/remote/rtc/alarm
Retrieves current sleep/wake schedule configuration.
POST /api/remote/rtc/alarm
Configures device sleep and wake timers.
POST /api/remote/rtc/alarm
Content-Type: application/json
Authorization: Bearer <token>

{
  "enabled": true,
  "onTime":  "08:00",
  "offTime": "22:00",
  "onDays":  []
}
onDays: Array of active days (0= Sunday ...6= Saturday). An empty array[]activates the alarm every day.
💡 Programmable RGB LED Status Bar
Control the RGB LED strip on the touch panel frame. State persists across reboots.
HTTP Endpoints
| Method | Endpoint | Description / Payload |
|---|---|---|
GET | /api/remote/led/state | Retrieves current LED state |
POST | /api/remote/led/on | { "on": true } or { "on": false } |
POST | /api/remote/led/color | { "red": 255, "green": 128, "blue": 0 } |
Example Response
{
  "status": "ok",
  "state": {
    "on": true,
    "red": 255,
    "green": 128,
    "blue": 0
  }
}
In-App JavaScript Bridge
Control LEDs directly from web projects without token or network calls:
window.appcontainer.gpioBridge.postMessage(JSON.stringify({ action: 'ledOn' }));
window.appcontainer.gpioBridge.postMessage(JSON.stringify({ action: 'ledOff' }));
window.appcontainer.gpioBridge.postMessage(JSON.stringify({
  action: 'ledColor',
  red: 255,
  green: 128,
  blue: 0
}));
🔌 GPIO & Relay Control
Control physical GPIO pins and relays via /dev/gpio_control:
| Pin | Hardware Label | Function / Type |
|---|---|---|
0 | IO 1 | Digital I/O (Read / Write) |
1 | IO 2 | Digital I/O (Read / Write) |
2 | Relay 1 | Relay Output Contact (CLOSED / OPEN) |
3 | Relay 2 | Relay Output Contact (CLOSED / OPEN) |
HTTP REST Endpoints
Write Pin Level
POST /api/remote/gpio/write
Content-Type: application/json
Authorization: Bearer <token>

{
  "pin": 2,
  "level": 1
}
Read Pin Status
POST /api/remote/gpio/read
Content-Type: application/json
Authorization: Bearer <token>

{
  "pin": 0
}
Response (200 OK)
{
  "status": "ok",
  "pin": 2,
  "level": 1,
  "ok": true
}
In-App JavaScript Bridge
// Write state (level 1 = HIGH/CLOSED, 0 = LOW/OPEN)
window.appcontainer.gpioBridge.postMessage(JSON.stringify({ action: 'write', pin: 2, level: 1 }));

// Read pin state
window.appcontainer.gpioBridge.postMessage(JSON.stringify({ action: 'read', pin: 0 }));
📡 RS-232 / RS-485 Serial Communication
Send and receive raw data over physical UART serial interfaces:
| Physical Port | Operating System Path |
|---|---|
| RS-232 | /dev/ttyS5 |
| RS-485 | /dev/ttyS9 |
Write Hex Data to Serial Port
POST /api/remote/serial/write
Content-Type: application/json
Authorization: Bearer <token>

{
  "port": "/dev/ttyS5",
  "baudRate": 9600,
  "hex": "010600660001A815"
}
Response (200 OK)
{
  "status": "ok",
  "port": "/dev/ttyS5",
  "sent": 8
}
Read Data from Serial Port
POST /api/remote/serial/read
Content-Type: application/json
Authorization: Bearer <token>

{
  "port": "/dev/ttyS9",
  "baudRate": 9600,
  "timeout": 500
}
Response (200 OK)
{
  "port": "/dev/ttyS9",
  "hex": "0103020000",
  "data": "..."
}
Close Serial Port
POST /api/remote/serial/close
Content-Type: application/json
Authorization: Bearer <token>

{
  "port": "/dev/ttyS5"
}
⚡ UDP Transmission
Send raw UDP datagrams - including network broadcasts - to any local IP address.
HTTP REST Endpoint
POST /api/remote/udp/send
Content-Type: application/json
Authorization: Bearer <token>

{
  "host": "192.168.1.255",
  "port": 502,
  "hex": "010600660001A815"
}
Response (200 OK)
{
  "status": "ok",
  "host": "192.168.1.255",
  "port": 502,
  "sent": 8
}
In-App JavaScript Bridge
Sends UDP directly from web projects. The Bearer token is pre-configured by the runtime environment:
// Send hex-encoded payload
window.appcontainer.sendUdp('192.168.1.255', 502, '010600660001A815');

// Send raw string payload
window.appcontainer.sendUdpRaw('192.168.1.255', 502, 'hello');
📲 Android App Management
Install, list, launch, and uninstall third-party Android packages on AVS touch panels.
List Installed Packages
GET /api/remote/apps/system
Authorization: Bearer <token>
Response (200 OK)
{
  "apps": [
    { "packageName": "com.example.app", "label": "Example App", "isSystem": false },
    { "packageName": "com.android.settings", "label": "Settings", "isSystem": true }
  ]
}
Launch Package
POST /api/remote/apps/launch
Content-Type: application/json
Authorization: Bearer <token>

{
  "packageName": "com.example.app"
}
Response (200 OK)
{ "status": "launched" }
Uninstall Package
DELETE /api/remote/apps/system/com.example.app
Authorization: Bearer <token>
Response (200 OK)
{ "status": "uninstalled" }
In-App JavaScript Bridge
window.appcontainer.launchApp('com.example.app');
window.appcontainer.uninstallApp('com.example.app');
Flutter / Dart SDK API
For native mobile applications compiled with Flutter:
await MobileBridge.oemInstallApk('/sdcard/Download/app.apk');
await MobileBridge.oemLaunchApp('com.example.app');
await MobileBridge.oemUninstallApp('com.example.app');
final String appsJson = await MobileBridge.oemGetInstalledApps();
📞 SIP / Intercom API
AVS Touch Panels and App Container feature native SIP protocol stack integration for full-duplex VoIP audio and video intercom communication with IP door stations (DoorBird, 2N, Mobotix), IP PBX systems, and peer-to-peer between panels.
Hosted web applications running in App Container can control intercom sessions directly via window.appcontainer.sip.
👉 For JavaScript bridge methods, status schemas, and telephony event listeners, see the Intercom / SIP API Documentation.
🔄 System Power Controls
Reboot the touch panel hardware remotely:
POST /api/remote/reboot
Authorization: Bearer <token>
Response (200 OK)
{
  "status": "rebooting"
}